
Developing Minimal Tekton Server
This blog is a descreptive account of the development of Minimal Tekton Server. This is highly technical in nature, so please make sure that you have sufficient knowledge about Golang, Docker, Kubernetes and TektonCD. You can refer to my [previous blog](/posts/development/i-am-loving-it-redhat/) to know about these topics.
Table of Contents
This blog is a descreptive account of the development of Minimal Tekton Server. This is highly technical in nature, so please make sure that you have sufficient knowledge about Golang, Docker, Kubernetes and TektonCD. You can refer to my previous blog to know about these topics.
As mentioned in my last blog, we were given to implement an application named Minimal Tekton Server. The problem statement reads:
We will be designing and implementing an application that will be talking to Tekton APIs to create resources on a Kubernetes/OpenShift Cluster. The application will expose some fields of the Tekton Resources which the user will provide and then this application will create Tekton resources by talking to Tekton APIs available on the cluster to create the resources based on the user-provided fields.
There are three parts in this project for the application and two more parts for the CI/CD using TektonCD and Kubernetes/OpenShift. I will go through each part descriptively and try to explain what we did.
The Architecture of MKS#
The first task in the development of the Minimal Tekton Server was creating its architectural diagram. Our first diagram was trash compared to the final diagram. Yeah, we learned. I will be explaining our final(obviously) architectural diagram and try to make some sense out of band-aids and duct tapes.
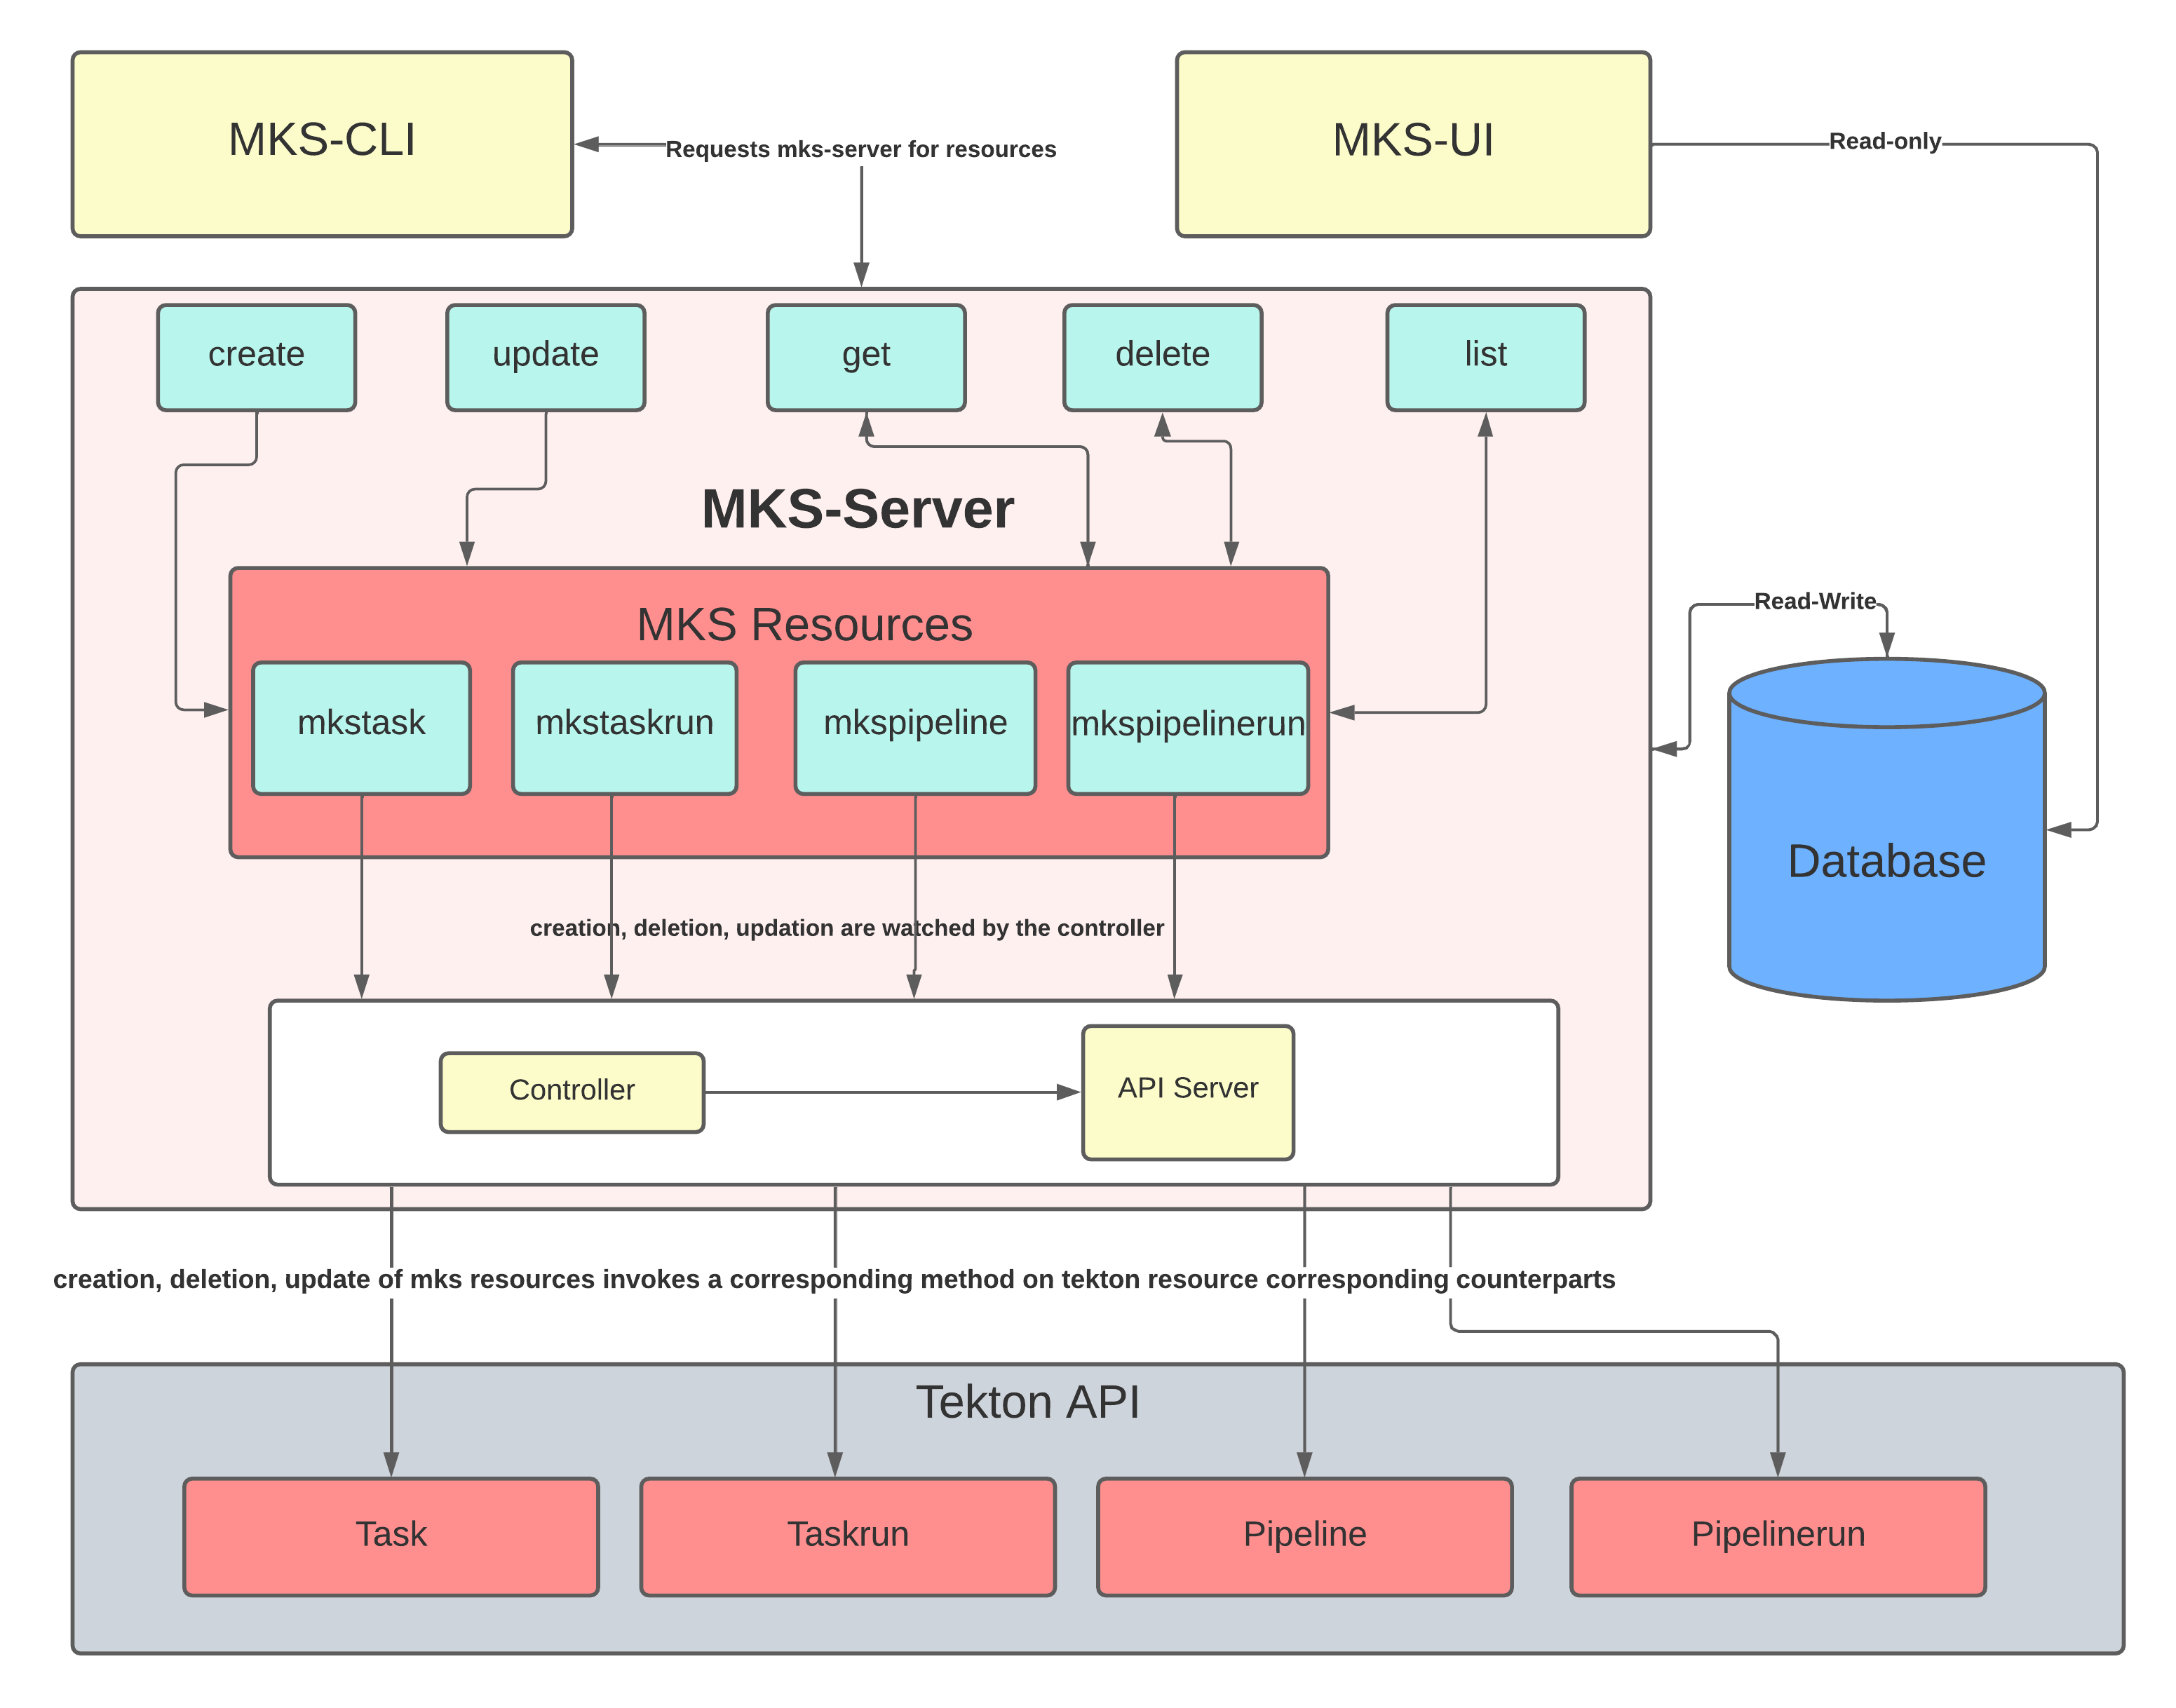
Let me start with explaining What are MKS Resources?. I hope you
know at least tidbits about Kubernetes and by the definition: A
resource is an endpoint in the Kubernetes API that stores a collection
of API objects of a certain kind; for example, the built-in
pods resource contains a collection of Pod objects. But
developers soon realized that these in-built resources were not enough
for the ever-growing applications of Kubernetes. Here custom
resource
comes into the picture. A custom resource is an extension of the
Kubernetes API that is not necessarily available in a default Kubernetes
installation. To define a custom resource we use something called
Custom Resource
Definition.
So MKS Resources are such custom resources that correspond to the
TektonCD custom resources.
Let us now focus on the box containing Controller and API server.
The controller can be said as a stimulus-response mechanism. Take the
analogy of a Venus Flytrap plant. The trap is initially open. There are
trigger hairs on the inside of the trap. Once an insect is detected,
there is a change of state and the trap closes in a blick on the eye.
The controller works the same way. It listens for the change in the
state of the MKS resources and immediately transfers the request to the
Tekton API to reflect the change in the corresponding Tekton resources.
The changes can be creation, deletion, or updating. The API server
ensures that there is a working connection between our controller and
the Tekton API.
MKS Server also exposes APIs to introduce a change of state in the MKS
resources. In technical terms these are called verbs. There are five
such verbs that we have exposed: create, update, get, delete,
and list. They can be utilized by a REST client, or in our case MKS
CLI to introduce desired change. The MKS command-line interface
provides commands and subcommands to do the desired tasks.
Whenever there is a change in the state, there is a logic running inside
the controller to react on that and that also affects our database. We
store four datapoints in our database: created, deleted,
completed, and failed. They tell us about the current statistcs of
our MKS resource using a single-page web app called MKS Dashboard
(or UI).
This was about the architecture of the Minimal Tekton Server. Let us jump into more technical stuff.
How to implement a CRD controller?#
During this assignment, something that took the most time and effort was the implementation of a controller for our custom resources. This isn’t very hard if you go by the rules and do the things according to the well-defined documents and blogs since this is a standard step in the implementation of any custom resource controller. But did we follow the rules? Hell no! But this time, let us go step-by-step.
- The first step is to define a
CustomResourceDefinitionfor our custom resource. Let us define a CRD calledspacetime. To do this you can write a YAML file like below.
# file: spacetime-crd.yaml
apiVersion: apiextensions.k8s.io/v1
kind: CustomResourceDefinition
metadata:
# name must match the spec fields below, and be in the form: <plural>.<group>
name: spacetimes.example.com
spec:
# group name to use for REST API: /apis/<group>/<version>
group: example.com
# list of versions supported by this CustomResourceDefinition
versions:
  - name: v1alpha1
  # Each version can be enabled/disabled by Served flag.
  served: true
  # One and only one version must be marked as the storage version.
  storage: true
  schema:
    openAPIV3Schema:
    type: object
    properties:
      spec:
      type: object
      properties:
        message:
        type: string
# either Namespaced or Cluster
scope: Namespaced
names:
  # plural name to be used in the URL: /apis/<group>/<version>/<plural>
  plural: spacetimes
  # singular name to be used as an alias on the CLI and for display
  singular: spacetime
  # kind is normally the CamelCased singular type. Your resource manifests use this.
  kind: SpaceTime
  # shortNames allow shorter string to match your resource on the CLI
  shortNames:
  - st
You can learn more about the fields and options
here.
The CRD that we defined above corresponds to the CustomResource given
below. Once you apply the above file you will be able to see the
spacetime custom resource on your Kubernetes/OpenShift cluster.
# file: spacetime-cr.yaml
apiVersion: spacetimes.example.com/v1alpha1
kind: SpaceTime
metadata:
  name: spacetime-cr
spec:
  message: "Hello from space!"
Apply them using the following commands:
kubectl apply -f spacetime-crd.yaml
kubectl apply -f spacetime-cr.yaml- Once we have defined our custom resources, we need to define the
types that will correspond to this custom resource definition. This
can be done using
k8s.io/apimachinery/pkg/apis/meta/v1package written in golang. Did I tell you that this is all in golang? Well, now you know. Create a package structure for a golang project and add the definition of the type as given below.
mkdir -p pkg/api/spacetime/v1alpha1
touch pkg/api/spacetime/v1alpha1/{spacetime_types,register,doc}.go pkg/api/spacetime/register.go
Add the following content to the corresponding files.
// file: /pkg/api/spacetime/v1alpha1/spacetime_types.go
package v1alpha1

import (
  metav1 "k8s.io/apimachinery/pkg/apis/meta/v1"
)

type SpaceTime struct {
  metav1.TypeMeta   `json:",inline"`
  metav1.ObjectMeta `json:"metadata,omitempty"`

  Spec SpaceTimeSpec `json:"spec"`
}

type SpaceTimeSpec struct {
  Message string  `json:"message"`
}

type SpaceTimeList struct {
  metav1.TypeMeta     `json:",inline"`
  metav1.ListMeta     `json:"metadata"`

  Items []SpaceTime   `json:"items"`
}Attribution#
- Photo by Luca Bravo on Unsplash.