
Configure Logitech MX Master 3S using LogiOps
I brought Logitech MX Master 3S mouse and it is a great mouse. It has a lot of features and I am still exploring them. One of the features is to configure the mouse using LogiOps. LogiOps is a command line tool to configure Logitech devices on Linux distos.
Table of Contents
I brought Logitech MX Master 3S mouse, and it is a great mouse. It has a lot of features, and I am still exploring them. One of the features is to configure the mouse using LogiOps. LogiOps is a command line tool to configure Logitech devices on Linux distros, since Logitech provides official tools to configure the mouse on Windows and macOS.
Logitech MX Master 3S#
Although I use keyboard shortcuts for most of my work, I still use the mouse a lot. It is usually very helpful to have a good mouse, especially when you have to scroll thousands of lines of code and documentation. This mouse features a superfast scroll wheel that can scroll thousands of lines in a second. In total there are 7 buttons on the mouse. The mouse can be connected to the computer via Bluetooth or a USB receiver. It can also be connected to multiple devices at the same time and can be switched between them using a button on the bottom of the mouse. The mouse can be charged using a USB-C cable, and it can be used while charging as well. You can see a 3D model of the mouse below. You can rotate the model using your mouse or touchpad.
The best part about this mouse is that it is very comfortable to use and highly customizable. You can customize most of the buttons and even extend the functionality by adding gestures. You can also customize the scroll wheel and the scroll direction as well as the DPI and the pointer speed. All this can be done using LogiOps.
Installing LogiOps#
It is an open source tool with code available on GitHub.
This blog post will show you how to install and configure LogiOps on Fedora. The
steps should be similar for other Linux distros and other Logitech mice as well.
You can directly install using dnf but for latest version, you can build from
source.
-
Install the dependencies.
sudo dnf install cmake libevdev-devel systemd-devel libconfig-devel gcc-c++ glib2-devel -
Clone the repository.
git clone https://github.com/PixlOne/logiops.git -
Build and install.
cd logiops
mkdir build
cd build
cmake -DCMAKE_BUILD_TYPE=Release ..
make
sudo make install
Configuring LogiOps#
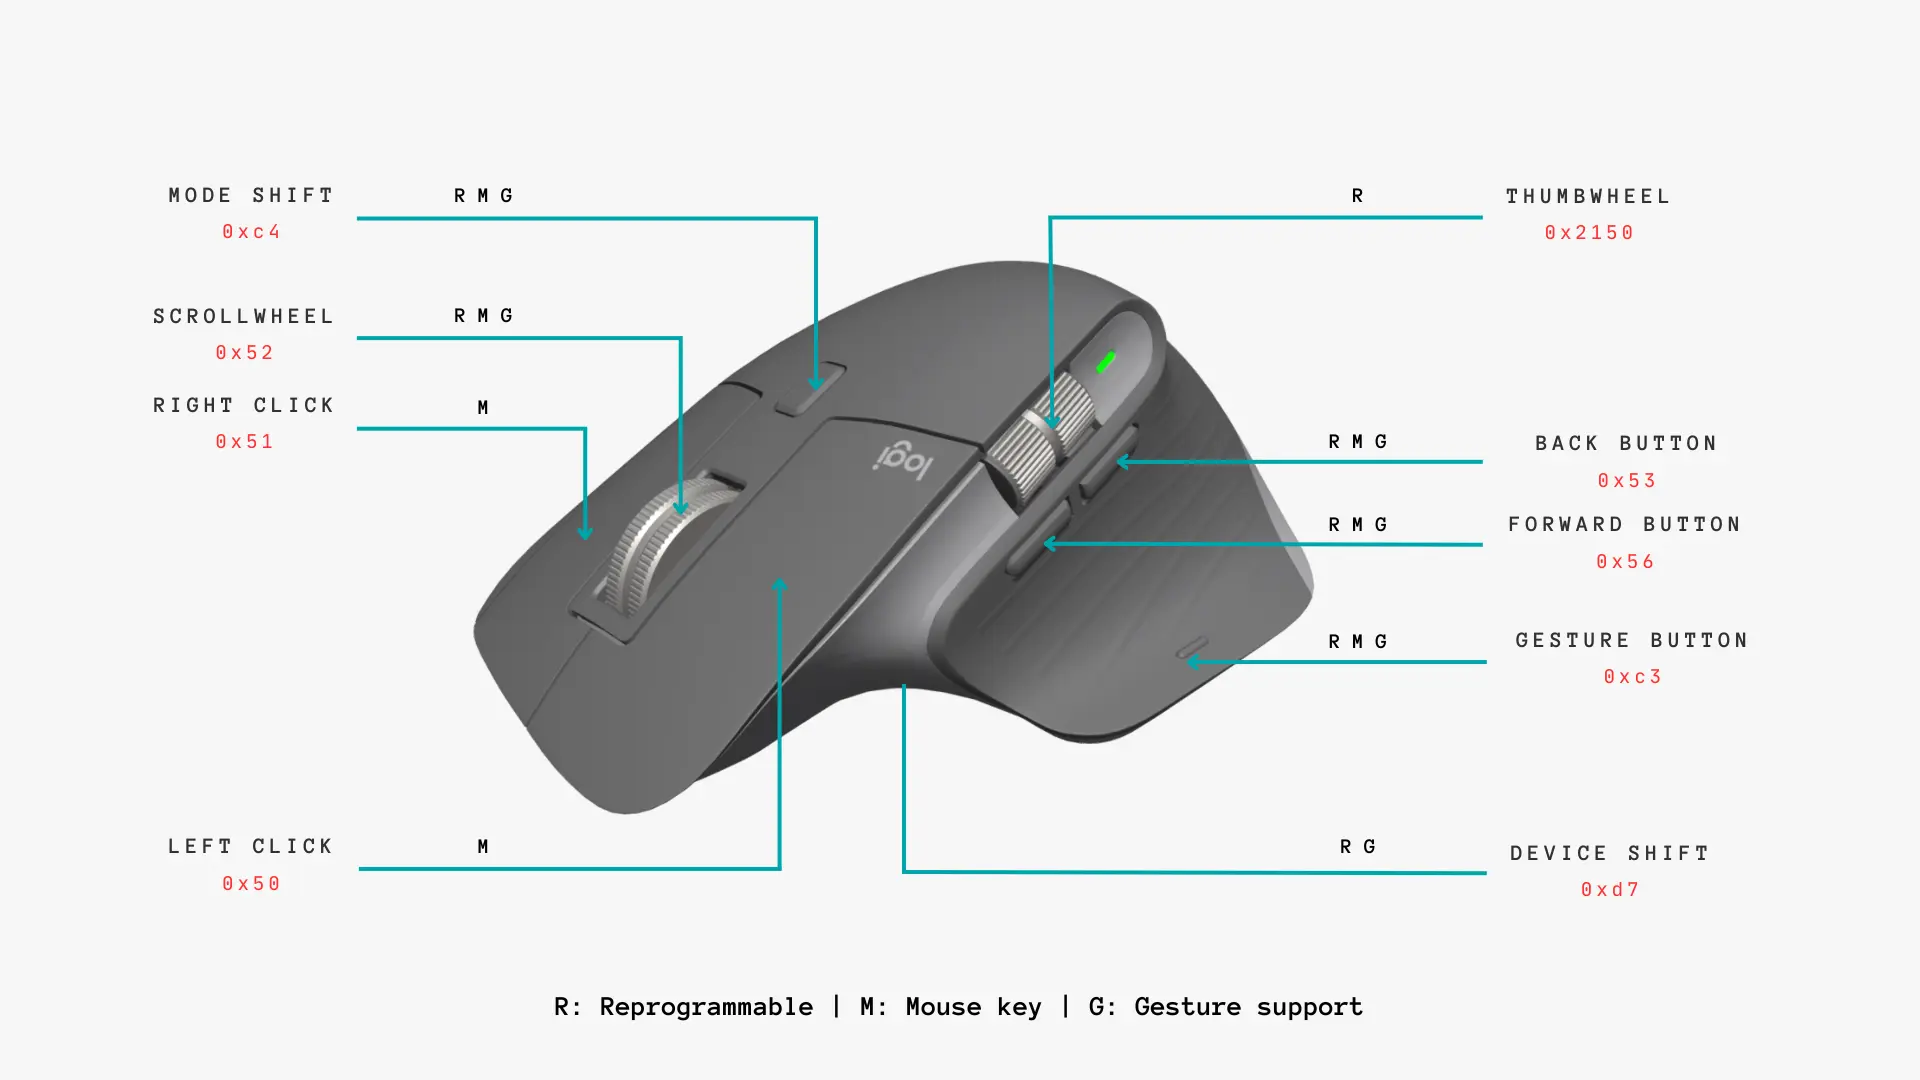
In this blog post I will show you what buttons are available and how you can configure actions (keypress or gestures) on them. Let us take a look at all the available buttons.
You can also get a table of available buttons, their CID and available features by running logid in debug mode.
sudo logid -dYou can get output like this:
[INFO] Device found: MX Master 3S on /dev/hidraw4:255
[DEBUG] /dev/hidraw4:255 remappable buttons:
[DEBUG] CID  | reprog? | fn key? | mouse key? | gesture support?
[DEBUG] 0x50 |         |         | YES        |
[DEBUG] 0x51 |         |         | YES        |
[DEBUG] 0x52 | YES     |         | YES        | YES
[DEBUG] 0x53 | YES     |         | YES        | YES
[DEBUG] 0x56 | YES     |         | YES        | YES
[DEBUG] 0xc3 | YES     |         | YES        | YES
[DEBUG] 0xc4 | YES     |         | YES        | YES
[DEBUG] 0xd7 | YES     |         |            | YES
[DEBUG] Thumb wheel detected (0x2150), capabilities:
[DEBUG] timestamp | touch | proximity | single tap
[DEBUG] YES       | YES   | YES       | YES
[DEBUG] Thumb wheel resolution: native (18), diverted (120)
You can see thumb wheel has some cool features like touch, proximity and single tap. Furthermore, you can configure these features in the configuration file. You can also configure the thumb wheel resolution.
Create a configuration file#
LogiOps uses a configuration file to configure the mouse. By default, the
configuration file is located at /etc/logid.cfg. If you cannot
find the file, you can create one. You can copy the default configuration file
and edit it. You can find the default configuration file
here. You can
read the documentation for the configuration file in this wiki.
sudo touch /etc/logid.cfgYou can also pass a custom path for the configuration file using -c flag. But
it never worked for me, so I am going to skip this part.
Understanding the configuration options#
You can obviously read the documentation for the configuration file, but I will focus on easy understanding of the options that will be more than enough for most users. I will be building the configuration file step by step and finally show you the complete configuration file.
-
Add a device and define its name
devices: ( { name: "MX Master 3S"; } ) -
Configure smartshift
smartshift: { on: true; threshold: 30; torque: 50; } -
Configure hires scrolling
hiresscroll: { hires: true; invert: false; target: false; } -
Configure dpi
dpi: 2000;
Next we will see how to configure the buttons.
Buttons#
Every button has a CID. You can see the CID of the buttons in the debug output as well as in the image above. Every remappable button has some actions that can be configured. You can configure a keypress or a gesture or a combination of both.
There can be two situations when you configure a button. Either you want to configure the button for a specific keypress, or you want to configure the button for a specific gesture. You can also configure the button for both keypress and gesture. In this case, the keypress will be triggered when you press the button and the gesture will be triggered when you press the button and move the mouse in a specific direction. The buttons can also be configured to toggle specific fetcures of the mouse like smartshift, hires scrolling, etc.
First create a button section for the button you want to configure.
buttons: (
  {
    <first-button>
  },
  {
    <second-button>
  }
)-
Configure only a keypress, let’s configure the wheel button to take screenshot
{ cid: 0x52; action = { type: "keypress"; keys: ["KEY_PRINT"] }; } -
Configure the top button to toggle SmartShift
{ cid: 0xc4; action = { type: "ToggleSmartShift"; } } -
configure the gesture button for the following (sway based gestures)
- keypress: Opens Terminal
- Up gesture: Snaps current window to top
- Down gesture: Snaps current window to bottom
- Left gesture: Snaps current window to left
- Right gesture: Snaps current window to right
{
  cid: 0xc3;
  action =
  {
    type: "Gestures";
    gestures: (
      {
        direction: "Up";
        mode: "OnRelease";
        action =
        {
          type: "Keypress";
          keys: ["KEY_LEFTMETA", "KEY_LEFTSHIFT", "KEY_UP"];
        };
      },
      {
        direction: "Down";
        mode: "OnRelease";
        action =
        {
          type: "Keypress";
          keys: ["KEY_LEFTMETA", "KEY_LEFTSHIFT", "KEY_DOWN"];
        };
      },
      {
        direction: "Left";
        mode: "OnRelease";
        action =
        {
          type: "Keypress";
          keys: ["KEY_LEFTMETA", "KEY_LEFTSHIFT", "KEY_LEFT"];
        };
      },
      {
        direction: "Right";
        mode: "OnRelease";
        action =
        {
          type: "Keypress";
          keys = ["KEY_LEFTMETA", "KEY_LEFTSHIFT", "KEY_RIGHT"];
        }
      },
      {
        direction: "None"
        mode: "OnRelease";
        action =
        {
          type: "Keypress";
          keys: ["KEY_LEFTMETA", "KEY_ENTER"];
        }
      }
    );
  };
}
The keypress while using with gestures is defined as direction None. These are just some examples, you can go through the documentation to see all the available options.
Complete configuration file#
Here is the complete configuration file that I use.
devices: (
{
  name: "MX Master 3S";
  smartshift:
  {
    on: true;
    threshold: 30;
    torque: 50;
  };
  hiresscroll:
  {
    hires: true;
    invert: false;
    target: false;
  };
  dpi: 2000;

  buttons: (
  {
    cid: 0xc3;
    action =
    {
      type: "Gestures";
      gestures: (
        {
          direction: "Up";
          mode: "OnRelease";
          action =
          {
            type: "Keypress";
            keys: ["KEY_LEFTMETA", "KEY_LEFTSHIFT", "KEY_UP"];
          };
        },
        {
          direction: "Down";
          mode: "OnRelease";
          action =
          {
            type: "Keypress";
            keys: ["KEY_LEFTMETA", "KEY_LEFTSHIFT", "KEY_DOWN"];
          };
        },
        {
          direction: "Left";
          mode: "OnRelease";
          action =
          {
            type: "Keypress";
            keys: ["KEY_LEFTMETA", "KEY_LEFTSHIFT", "KEY_LEFT"];
          };
        },
        {
          direction: "Right";
          mode: "OnRelease";
          action =
          {
            type: "Keypress";
            keys = ["KEY_LEFTMETA", "KEY_LEFTSHIFT", "KEY_RIGHT"];
          }
        },
        {
          direction: "None"
          mode: "OnRelease";
          action =
          {
            type: "Keypress";
            keys: ["KEY_LEFTMETA", "KEY_ENTER"];
          }
        }
      );
    };
  },
  {
    cid: 0x52;
    action =
    {
      type: "Keypress";
      keys: ["KEY_RIGHTCTRL", "KEY_PRINT"]
    };
  },
  {
    cid: 0xc4;
    action =
    {
      type: "ToggleSmartshift";
    };
  }
  );
}
);
Post Configuration#
Once configured you will need to restart the logid service.
sudo systemctl restart logidVoila! You have successfully configured your Logitech mouse.